Author: Mike Olgren

  • KAKT: The Chose

    Map of The Chosen from King Arthur Knight's Tale game.
    Screenshot by Mike Olgren from King Arthur Knight’s Tale The Chosen map.

    B = battle (between two other groups)
    C = chest
    E = encounter
    F = campfire
    H = hero
    J1 = jump to J2
    K = locked door (needs key)
    M = point of interest
    N = optional battle
    P = traps
    R = shrine
    S = start
    T = treasure pile
    X = hidden treasure

    Joined by 2 NPCs (arcanist and marksman), just for this Mission. On this Mission there are two opportunities to raise either Christian or Old-Faith.

    Return to King Arthur Knight’s Tale maps

  • KAKT: The Curse of Sir Bors

    Map of The Curse of Sir Bors from King Arthur Knight's Tale game.
    Screenshot by Mike Olgren from King Arthur Knight’s Tale The Curse of Sir Bors map.

    B = battle (between two other groups)
    C = chest
    E = encounter
    F = campfire
    H = hero
    J1 = jump to J2
    K = locked door (needs key)
    M = point of interest
    N = optional battle
    P = traps
    R = shrine
    S = start
    T = treasure pile
    X = hidden treasure

    Hero is Sir Bors, who joins party and Round Table.

    Return to King Arthur Knight’s Tale maps

  • KAKT: The Excalibur

    Map of The Excalibur mission from King Arthur Knight's Tale game.
    Screenshot by Mike Olgren from King Arthur Knight’s Tale The Excalibur map.

    B = battle (between two other groups)
    C = chest
    E = encounter
    F = campfire
    H = hero
    J1 = jump to J2
    K = locked door (needs key)
    M = point of interest
    N = optional battle
    P = traps
    R = shrine
    S = start
    T = treasure pile
    X = hidden treasure

    Hero is Sir Percivale who joins in battles but does not join the Round Table after the Mission (although Lady Guinevere will).

    Return to King Arthur Knight’s Tale maps

  • KAKT: The Curse of the Black Knight

    Map of The Curse of the Black Knight from King Arthur Knight's Tale game.
    Screenshot by Mike Olgren from King Arthur Knight’s Tale The Curse of the Black Knight map.

    B = battle (between two other groups)
    C = chest
    E = encounter
    F = campfire
    H = hero
    J1 = jump to J2
    K = locked door (needs key)
    M = point of interest
    N = optional battle
    P = traps
    R = shrine
    S = start
    T = treasure pile
    X = hidden treasure

    Hero is the Black Knight, who appears and then disappears after battles. He eventually will join the party.

    Return to King Arthur Knight’s Tale maps

  • King Arthur Knight’s Tale starting hints

    Some non-spoiler hints I wish I knew before starting King Arthur Knight’s Tale.

    Experience limitations

    Heroes only gain experience through the Training Grounds, infrequent Events, or Missions. [Rare boosts to experience occur via Shrines and Tomes.] This makes it difficult to maintain a cadre of more than about 8-9 Heroes. Keeping more Heroes will likely lead to under-leveled Heroes trying to complete higher level Missions. You can efficiently select Heroes by sticking to one Morality axis, e.g. Old-Faith/Tyrant, or Christian/Rightly. However, you can still just choose whatever Heroes you like; just keep the roster lean and mean!

    Mission lockouts

    • You can only change difficulty outside of missions, i.e. on the world map or in Camelot.
    • You cannot equip items, including potions, once a mission has started. You can only add/change gear on the world map or in Camelot. Choose wisely.

    Pause before clicking Finish Mission

    Once you’ve completed all the goals of the Mission, you will see a glowing “Finish Mission” button on the right. You can leave that be and walk around the map to collect any other loot or fight any non-essential battles. If your Heroes aren’t too banged up, you want to fight those battles to increase the experience gained (see Experience Limitations above).

    Difficulty

    I play on Normal difficulty because of the wild difficulty spike on the last Mission of Act 1. Otherwise, Moderate would work for me, a very average gamer.

    I’m afraid I cannot recommend Ironman mode because the game crashes about once every 10 sessions, and that is annoying enough to me, let alone losing an hour of game. I suspect this is due to the heavy drain this game pulls on my fairly decent machine. See my machine specs here: About VGOG

    General tactics

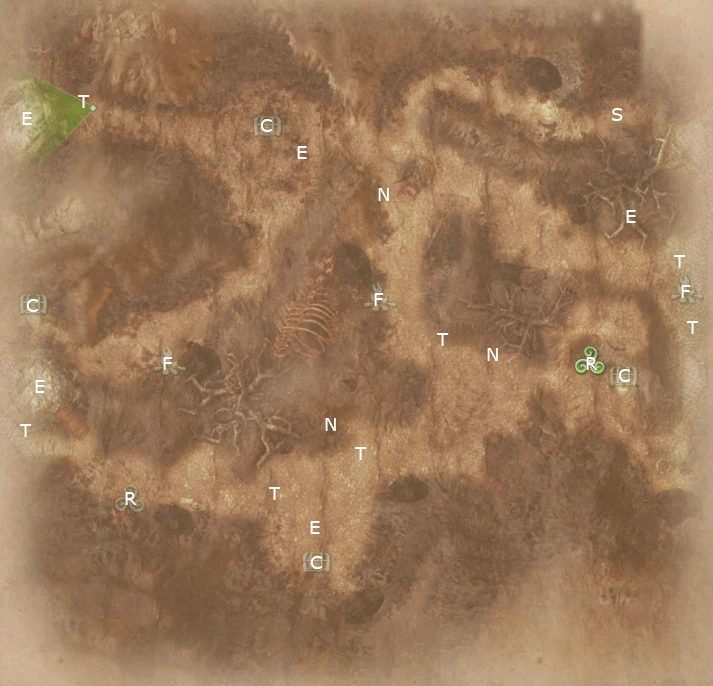
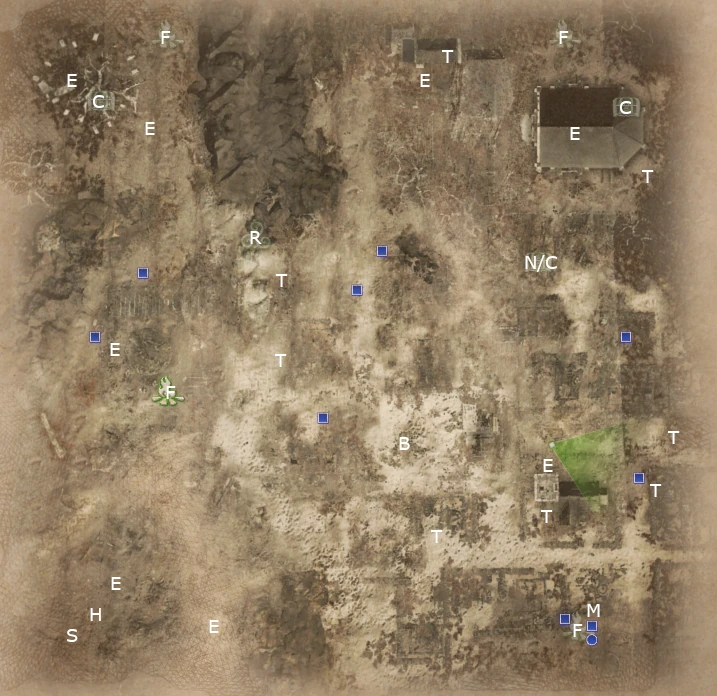
    Campfires allow you to replenish either some Hit Points or Armour. How much depends on your difficulty level. You do not have to use a Campfire when you find it– you can come back later when your armour/HP are more depleted. You can also save Shrine bonuses for later, since most Missions have one final “boss” battle.

    Some battles can be approached from different sides. All units get a backstab bonus, so if you can enter a battle behind an enemy, that’s an advantage. Similarly, which direction your Heroes face at the end of a turn matters. Don’t set yourself up to be backstabbed!

  • KAKT: The Confrontation

    Map of The Confrontation from King Arthur Knight's Tale game.
    Screenshot by Mike Olgren from King Arthur Knight’s Tale The Confrontation.

    B = battle (between two other groups)
    C = chest
    E = encounter
    F = campfire
    H = hero
    J1 = jump to J2
    K = locked door (needs key)
    M = point of interest
    N = optional battle
    P = traps
    R = shrine
    S = start
    T = treasure pile
    X = hidden treasure

    Map is incomplete– several encounters are avoidable, and difficulty level is quite high. Hero is Lady Guinevere, who fights with you but does not join Round Table yet.

    Return to King Arthur Knight’s Tale maps

  • KAKT: The Sadness of Sir Tegyr

    Screenshot by Mike Olgren from King Arthur Knight’s Tale The Sadness of Sir Tegyr map.

    B = battle (between two other groups)
    C = chest
    E = encounter
    F = campfire
    H = hero
    J1 = jump to J2
    K = locked door (needs key)
    M = point of interest
    N = optional battle
    P = traps
    R = shrine
    S = start
    T = treasure pile
    X = hidden treasure

    Hero is Sir Tegyr, who joins the group.

    Return to King Arthur Knight’s Tale maps

  • KAKT: The Knight of Thorns

    Map of The Knight of Thorns from King Arthur Knight's Tale game.
    Screenshot by Mike Olgren from King Arthur Knight’s Tale The Knight of Thorns

    B = battle (between two other groups)
    C = chest
    E = encounter
    F = campfire
    H = hero
    J1 = jump to J2
    K = locked door (needs key)
    M = point of interest
    N = optional battle
    P = traps
    R = shrine
    S = start
    T = treasure pile
    X = hidden treasure

    Hero is Sir Brunor de Noir.

    Return to King Arthur Knight’s Tale maps

  • KAKT: The Besieged Castle

    Map of The Besieged Castle from King Arthur Knight's Tale game.
    Screenshot by Mike Olgren from King Arthur Knight’s Tale The Besieged Castle.

    B = battle (between two other groups)
    C = chest
    E = encounter
    F = campfire
    H = hero
    J1 = jump to J2
    K = locked door (needs key)
    M = point of interest
    N = optional battle
    P = traps
    R = shrine
    S = start
    T = treasure pile
    X = hidden treasure

    Hero is Lady Guinevere, who fights with you on this mission, but does not yet join the Round Table.

    Return to King Arthur Knight’s Tale maps

  • KAKT: Heart of Midnight

    Map of Heart of Midnight from King Arthur Knight's Tale game.
    Screenshot by Mike Olgren from King Arthur Knight’s Tale Heart of Midnight map.

    B = battle (between two other groups)
    C = chest
    E = encounter
    F = campfire
    H = hero
    J1 = jump to J2
    K = locked door (needs key)
    M = point of interest
    N = optional battle
    P = traps
    R = shrine
    S = start
    T = treasure pile
    X = hidden treasure

    I found the final battle here to be a crazy spike in difficulty, even on Moderate. [I completed it one notch down on Normal]. You cannot change difficulty once on a mission. You can only change difficulty on the world map or in Camelot.

    Return to King Arthur Knight’s Tale maps