Author: Mike Olgren

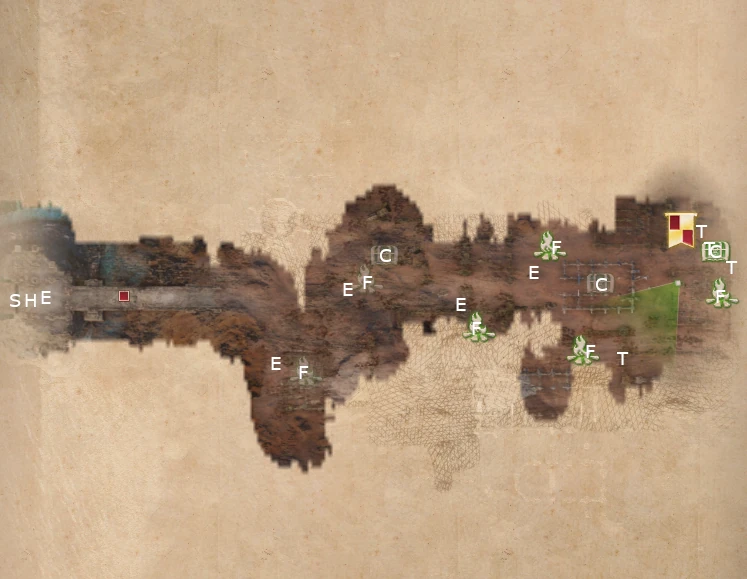
  • KAKT: The Confrontation

    Map of The Confrontation from King Arthur Knight's Tale game.
    Screenshot by Mike Olgren from King Arthur Knight’s Tale The Confrontation.

    B = battle (between two other groups)
    C = chest
    E = encounter
    F = campfire
    H = hero
    J1 = jump to J2
    K = locked door (needs key)
    M = point of interest
    N = optional battle
    P = traps
    R = shrine
    S = start
    T = treasure pile
    X = hidden treasure

    Map is incomplete– several encounters are avoidable, and difficulty level is quite high. Hero is Lady Guinevere, who fights with you but does not join Round Table yet.

    Return to King Arthur Knight’s Tale maps
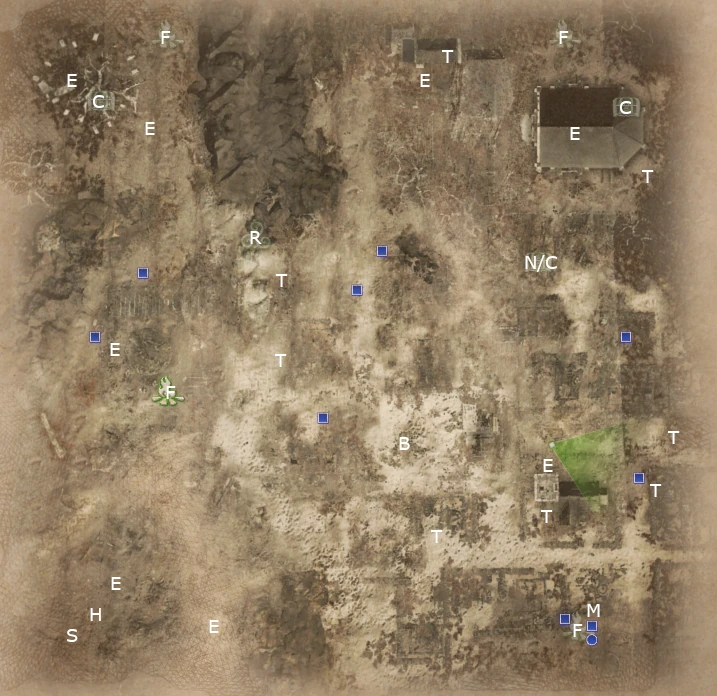
  • KAKT: The Sadness of Sir Tegyr

    Screenshot by Mike Olgren from King Arthur Knight’s Tale The Sadness of Sir Tegyr map.

    B = battle (between two other groups)
    C = chest
    E = encounter
    F = campfire
    H = hero
    J1 = jump to J2
    K = locked door (needs key)
    M = point of interest
    N = optional battle
    P = traps
    R = shrine
    S = start
    T = treasure pile
    X = hidden treasure

    Hero is Sir Tegyr, who joins the group.

    Return to King Arthur Knight’s Tale maps
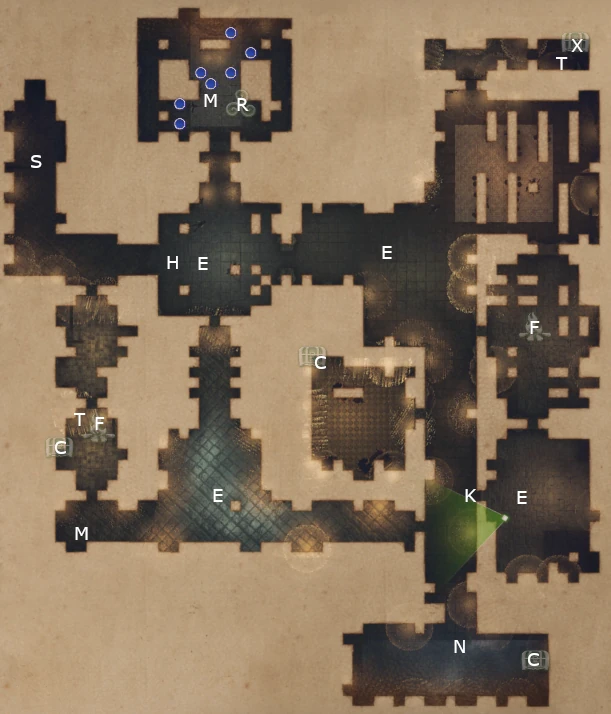
  • KAKT: The Knight of Thorns

    Map of The Knight of Thorns from King Arthur Knight's Tale game.
    Screenshot by Mike Olgren from King Arthur Knight’s Tale The Knight of Thorns

    B = battle (between two other groups)
    C = chest
    E = encounter
    F = campfire
    H = hero
    J1 = jump to J2
    K = locked door (needs key)
    M = point of interest
    N = optional battle
    P = traps
    R = shrine
    S = start
    T = treasure pile
    X = hidden treasure

    Hero is Sir Brunor de Noir.

    Return to King Arthur Knight’s Tale maps
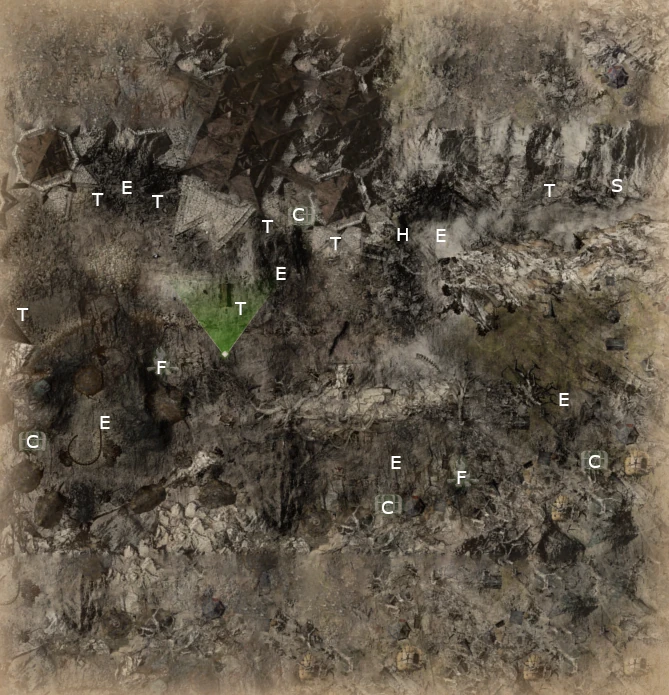
  • KAKT: The Besieged Castle

    Map of The Besieged Castle from King Arthur Knight's Tale game.
    Screenshot by Mike Olgren from King Arthur Knight’s Tale The Besieged Castle.

    B = battle (between two other groups)
    C = chest
    E = encounter
    F = campfire
    H = hero
    J1 = jump to J2
    K = locked door (needs key)
    M = point of interest
    N = optional battle
    P = traps
    R = shrine
    S = start
    T = treasure pile
    X = hidden treasure

    Hero is Lady Guinevere, who fights with you on this mission, but does not yet join the Round Table.

    Return to King Arthur Knight’s Tale maps
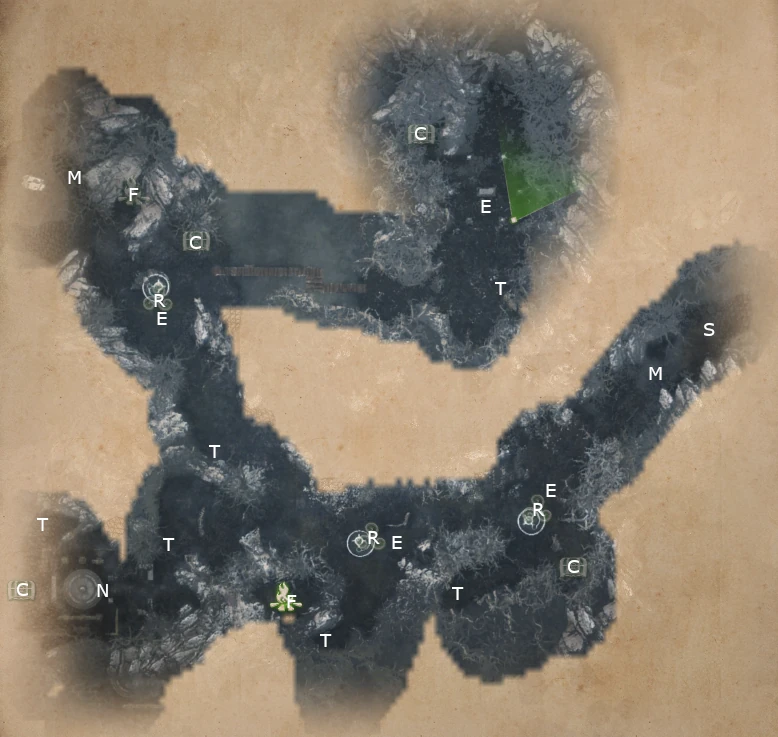
  • KAKT: Heart of Midnight

    Map of Heart of Midnight from King Arthur Knight's Tale game.
    Screenshot by Mike Olgren from King Arthur Knight’s Tale Heart of Midnight map.

    B = battle (between two other groups)
    C = chest
    E = encounter
    F = campfire
    H = hero
    J1 = jump to J2
    K = locked door (needs key)
    M = point of interest
    N = optional battle
    P = traps
    R = shrine
    S = start
    T = treasure pile
    X = hidden treasure

    I found the final battle here to be a spike in difficulty. With careful strategy could beat it on moderate, taking some injuries. You cannot change difficulty once on a mission. You can only change difficulty on the world map or in Camelot.

    This mission ends Act 1.

    Return to King Arthur Knight’s Tale maps
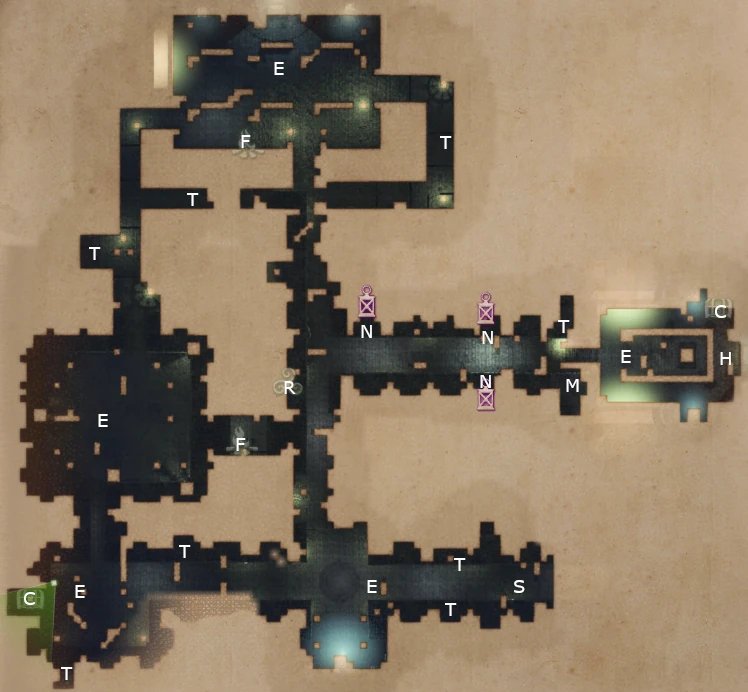
  • KAKT: The Warrior Queen

    Map of The Warrior Queen from King Arthur Knight's Tale mission.
    Screenshot by Mike Olgren from King Arthur Knight’s Tale The Warrior Queen map.

    B = battle (between two other groups)
    C = chest
    E = encounter
    F = campfire
    H = hero
    J1 = jump to J2
    K = locked door (needs key)
    M = point of interest
    N = optional battle
    P = traps
    R = shrine
    S = start
    T = treasure pile
    X = hidden treasure

    Hero is Lady Boudicea; you cannot recruit her yet, but she does fight with you (once freed).

    Return to King Arthur Knight’s Tale maps
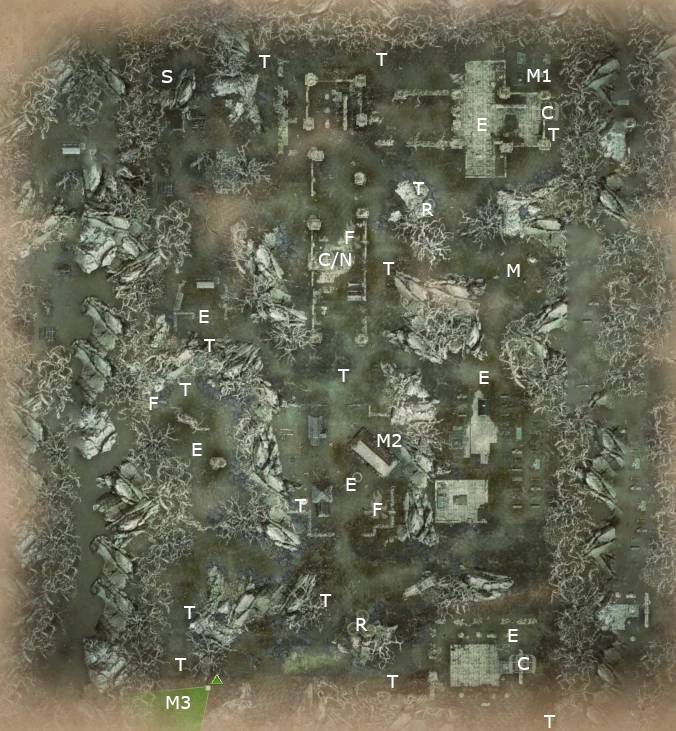
  • KAKT: The Return

    Map of The Return in King Arthur Knight's Tale .
    Screenshot by Mike Olgren from King Arthur Knight’s Tale The Return map.

    B = battle (between two other groups)
    C = chest
    E = encounter
    F = campfire
    H = hero
    J1 = jump to J2
    K = locked door (needs key)
    M = point of interest
    N = optional battle
    P = traps
    R = shrine
    S = start
    T = treasure pile
    X = hidden treasure

    Final battle (south) is tough.

    Return to King Arthur Knight’s Tale maps
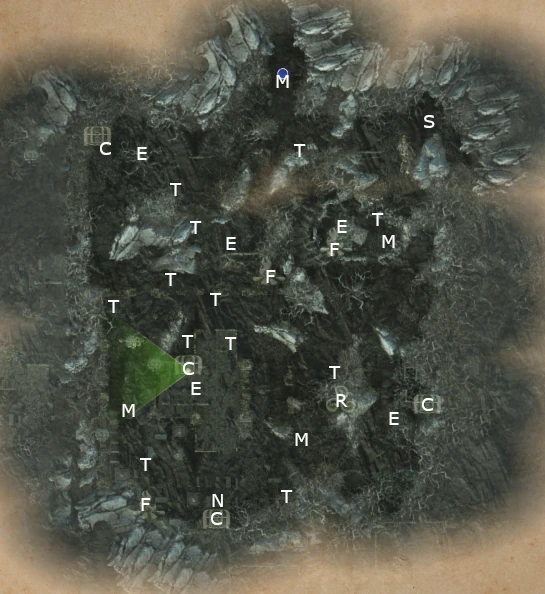
  • KAKT: Thistlewood Ruins

    Map of Thistlewood Ruins in King Arthur Knight's Tale game.
    Screenshot by Mike Olgren from King Arthur Knight’s Tale Thistlewood Ruins map

    B = battle (between two other groups)
    C = chest
    E = encounter
    F = campfire
    H = hero
    J1 = jump to J2
    K = locked door (needs key)
    M = point of interest
    N = optional battle
    P = traps
    R = shrine
    S = start
    T = treasure pile
    X = hidden treasure

    Return to King Arthur Knight’s Tale maps
  • KAKT: The Haunted Forest

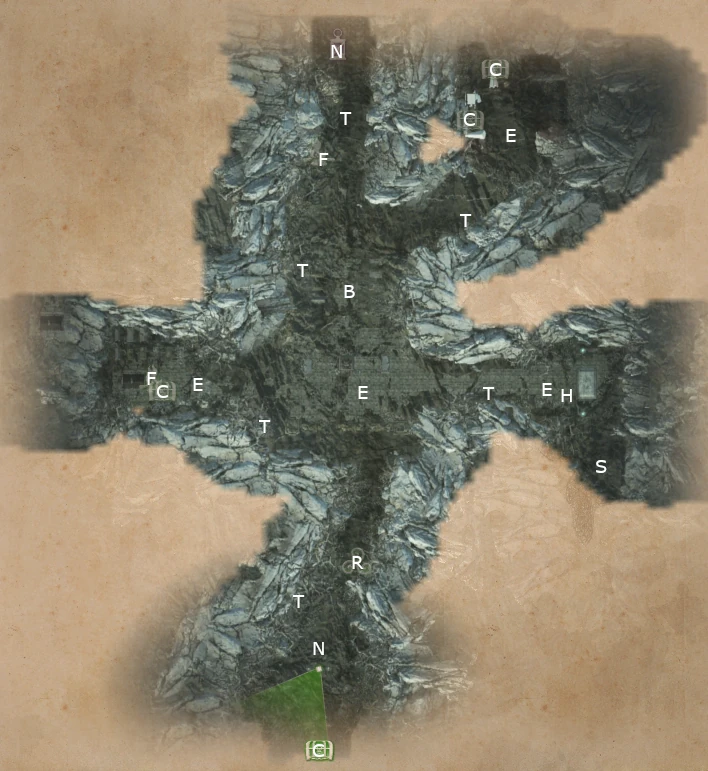
    Map of The Haunted Forest from King Arthur Knight's Tale game
    Screenshot by Mike Olgren from King Arthur Knight’s Tale The Haunted Forest mission

    B = battle (between two other groups)
    C = chest
    E = encounter
    F = campfire
    H = hero
    J1 = jump to J2
    K = locked door (needs key)
    M = point of interest
    N = optional battle
    P = traps
    R = shrine
    S = start
    T = treasure pile
    X = hidden treasure

    Encounters in the north and south areas are optional but will add loot and experience.

    Return to King Arthur Knight’s Tale maps
  • KAKT: Forbidden Keep

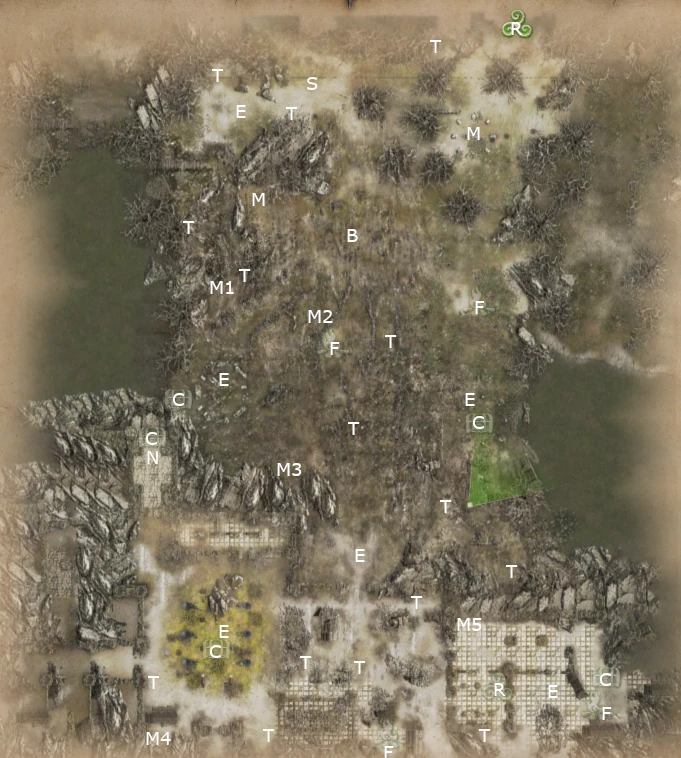
    Screenshot by Mike Olgren from King Arthur Knight’s Tale Forbidden Keep map

    B = battle (between two other groups)
    C = chest
    E = encounter
    F = campfire
    H = hero
    J1 = jump to J2
    K = locked door (needs key)
    M = point of interest
    N = optional battle
    P = traps
    R = shrine
    S = start
    T = treasure pile
    X = hidden treasure

    Return to King Arthur Knight’s Tale maps