Tag: Map

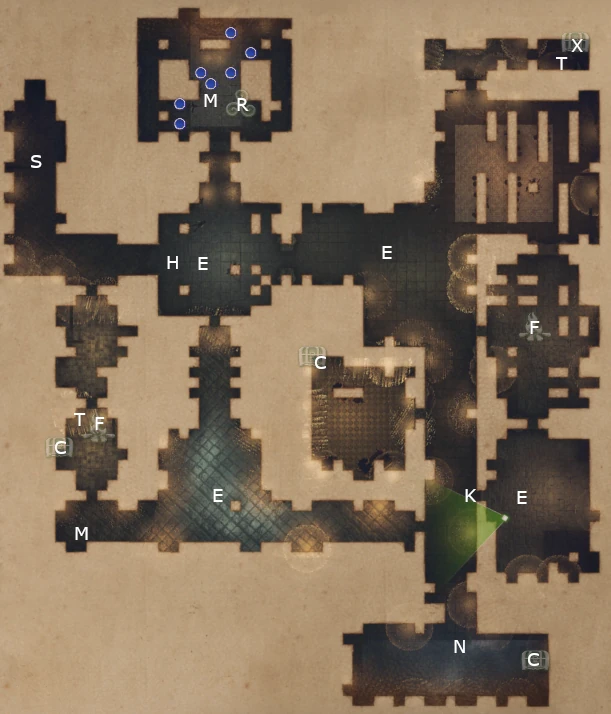
  • KAKT: The Knight of Thorns

    Map of The Knight of Thorns from King Arthur Knight's Tale game.
    Screenshot by Mike Olgren from King Arthur Knight’s Tale The Knight of Thorns

    B = battle (between two other groups)
    C = chest
    E = encounter
    F = campfire
    H = hero
    J1 = jump to J2
    K = locked door (needs key)
    M = point of interest
    N = optional battle
    P = traps
    R = shrine
    S = start
    T = treasure pile
    X = hidden treasure

    Hero is Sir Brunor de Noir.

    Return to King Arthur Knight’s Tale maps
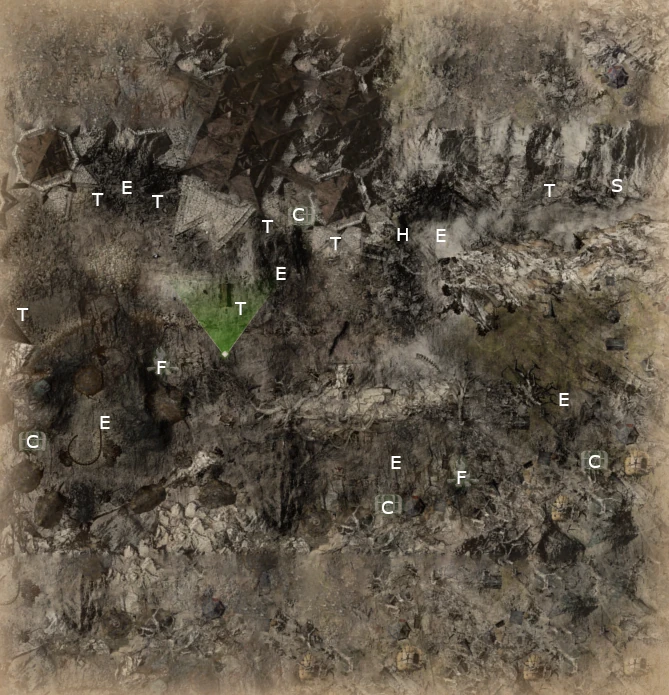
  • KAKT: The Besieged Castle

    Map of The Besieged Castle from King Arthur Knight's Tale game.
    Screenshot by Mike Olgren from King Arthur Knight’s Tale The Besieged Castle.

    B = battle (between two other groups)
    C = chest
    E = encounter
    F = campfire
    H = hero
    J1 = jump to J2
    K = locked door (needs key)
    M = point of interest
    N = optional battle
    P = traps
    R = shrine
    S = start
    T = treasure pile
    X = hidden treasure

    Hero is Lady Guinevere, who fights with you on this mission, but does not yet join the Round Table.

    Return to King Arthur Knight’s Tale maps
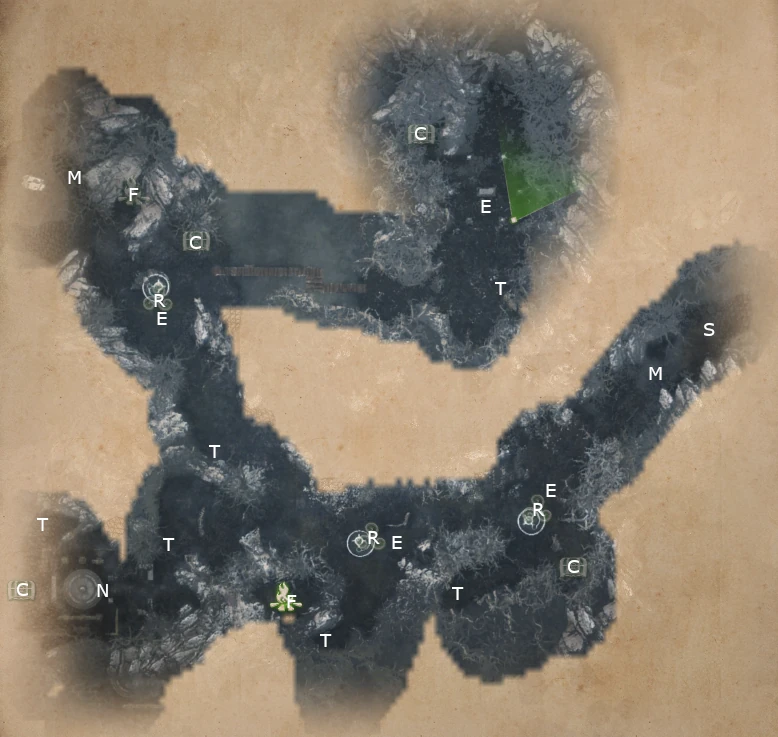
  • KAKT: Heart of Midnight

    Map of Heart of Midnight from King Arthur Knight's Tale game.
    Screenshot by Mike Olgren from King Arthur Knight’s Tale Heart of Midnight map.

    B = battle (between two other groups)
    C = chest
    E = encounter
    F = campfire
    H = hero
    J1 = jump to J2
    K = locked door (needs key)
    M = point of interest
    N = optional battle
    P = traps
    R = shrine
    S = start
    T = treasure pile
    X = hidden treasure

    I found the final battle here to be a spike in difficulty. With careful strategy could beat it on moderate, taking some injuries. You cannot change difficulty once on a mission. You can only change difficulty on the world map or in Camelot.

    This mission ends Act 1.

    Return to King Arthur Knight’s Tale maps
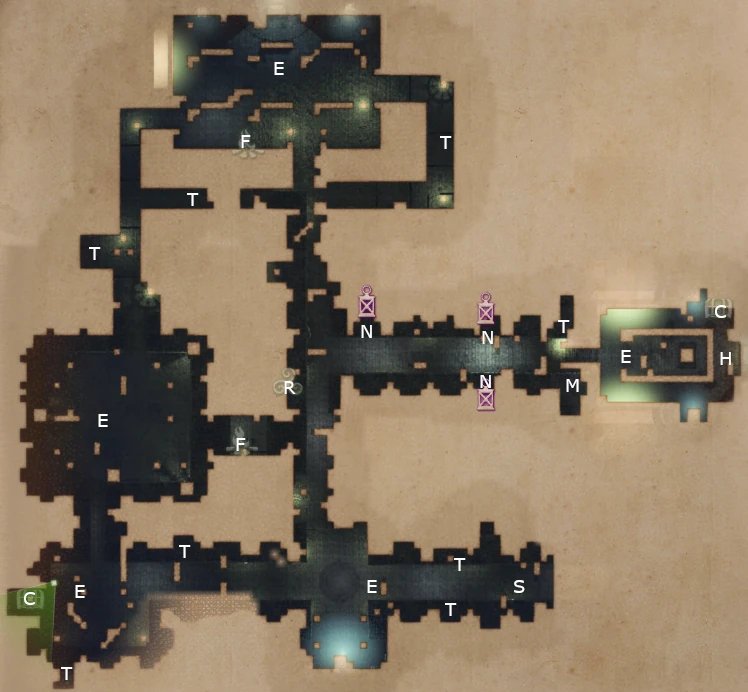
  • KAKT: The Warrior Queen

    Map of The Warrior Queen from King Arthur Knight's Tale mission.
    Screenshot by Mike Olgren from King Arthur Knight’s Tale The Warrior Queen map.

    B = battle (between two other groups)
    C = chest
    E = encounter
    F = campfire
    H = hero
    J1 = jump to J2
    K = locked door (needs key)
    M = point of interest
    N = optional battle
    P = traps
    R = shrine
    S = start
    T = treasure pile
    X = hidden treasure

    Hero is Lady Boudicea; you cannot recruit her yet, but she does fight with you (once freed).

    Return to King Arthur Knight’s Tale maps
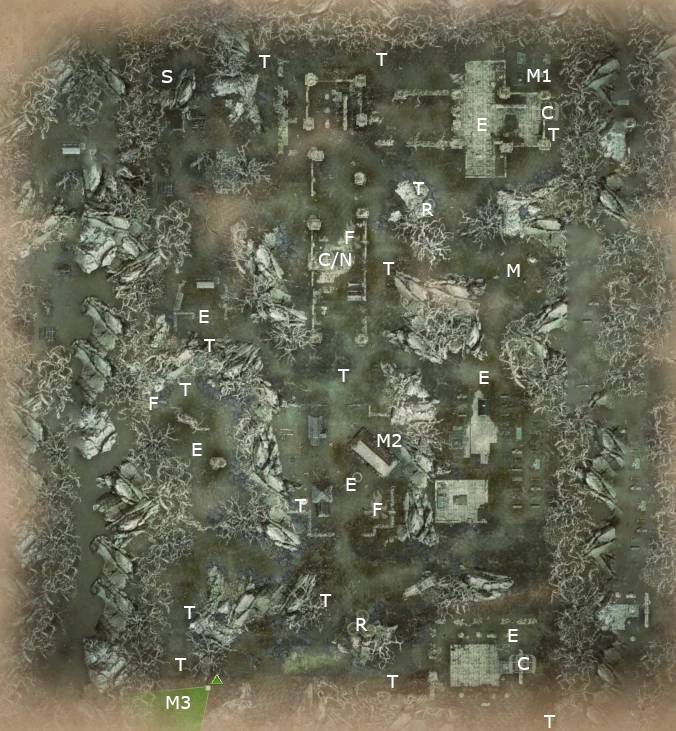
  • KAKT: The Return

    Map of The Return in King Arthur Knight's Tale .
    Screenshot by Mike Olgren from King Arthur Knight’s Tale The Return map.

    B = battle (between two other groups)
    C = chest
    E = encounter
    F = campfire
    H = hero
    J1 = jump to J2
    K = locked door (needs key)
    M = point of interest
    N = optional battle
    P = traps
    R = shrine
    S = start
    T = treasure pile
    X = hidden treasure

    Final battle (south) is tough.

    Return to King Arthur Knight’s Tale maps
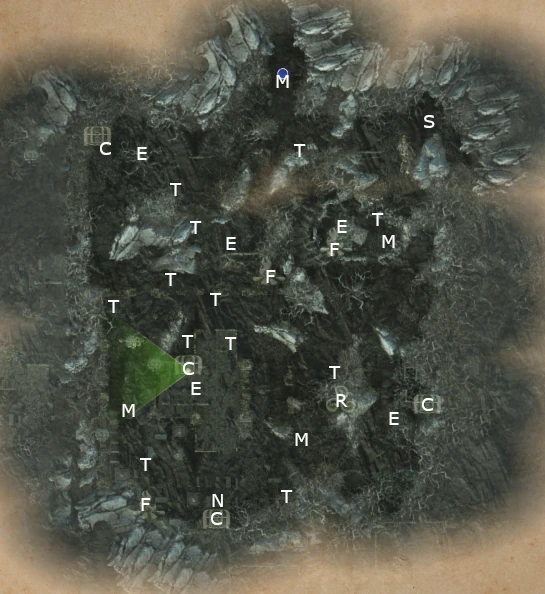
  • KAKT: Thistlewood Ruins

    Map of Thistlewood Ruins in King Arthur Knight's Tale game.
    Screenshot by Mike Olgren from King Arthur Knight’s Tale Thistlewood Ruins map

    B = battle (between two other groups)
    C = chest
    E = encounter
    F = campfire
    H = hero
    J1 = jump to J2
    K = locked door (needs key)
    M = point of interest
    N = optional battle
    P = traps
    R = shrine
    S = start
    T = treasure pile
    X = hidden treasure

    Return to King Arthur Knight’s Tale maps
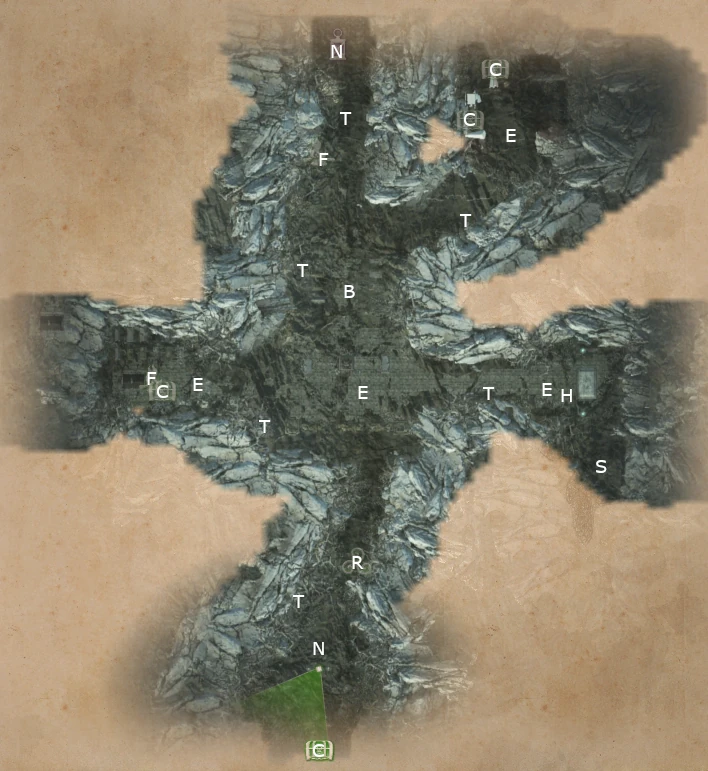
  • KAKT: The Haunted Forest

    Map of The Haunted Forest from King Arthur Knight's Tale game
    Screenshot by Mike Olgren from King Arthur Knight’s Tale The Haunted Forest mission

    B = battle (between two other groups)
    C = chest
    E = encounter
    F = campfire
    H = hero
    J1 = jump to J2
    K = locked door (needs key)
    M = point of interest
    N = optional battle
    P = traps
    R = shrine
    S = start
    T = treasure pile
    X = hidden treasure

    Encounters in the north and south areas are optional but will add loot and experience.

    Return to King Arthur Knight’s Tale maps
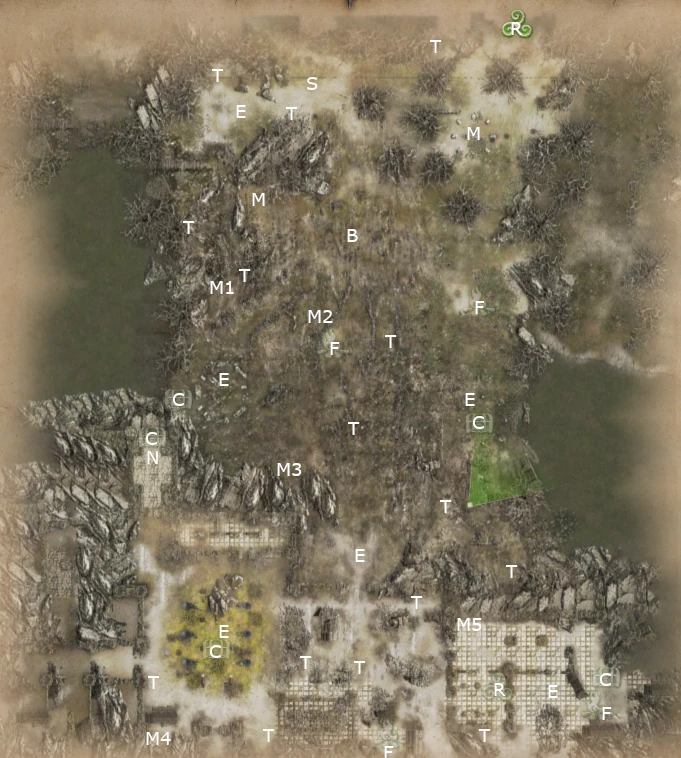
  • KAKT: Forbidden Keep

    Screenshot by Mike Olgren from King Arthur Knight’s Tale Forbidden Keep map

    B = battle (between two other groups)
    C = chest
    E = encounter
    F = campfire
    H = hero
    J1 = jump to J2
    K = locked door (needs key)
    M = point of interest
    N = optional battle
    P = traps
    R = shrine
    S = start
    T = treasure pile
    X = hidden treasure

    Return to King Arthur Knight’s Tale maps
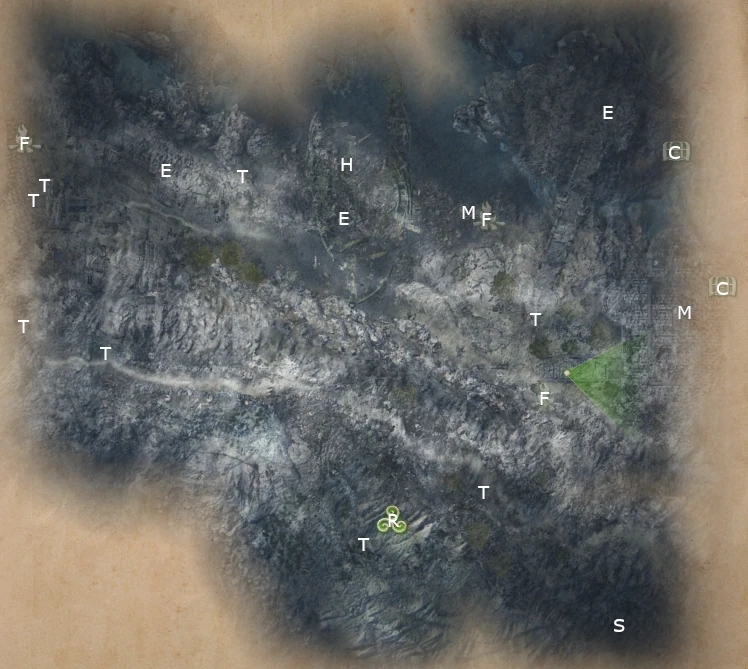
  • KAKT: The Cursed Ship

    Map of The Cursed Ship mission in King Arthur Knight's Tale game.
    Screenshot by Mike Olgren from King Arthur Knight’s Tale The Cursed Ship map.

    B = battle (between two other groups)
    C = chest
    E = encounter
    F = campfire
    H = hero
    J1 = jump to J2
    K = locked door (needs key)
    M = point of interest
    N = optional battle
    P = traps
    R = shrine
    S = start
    T = treasure pile
    X = hidden treasure

    Return to King Arthur Knight’s Tale maps
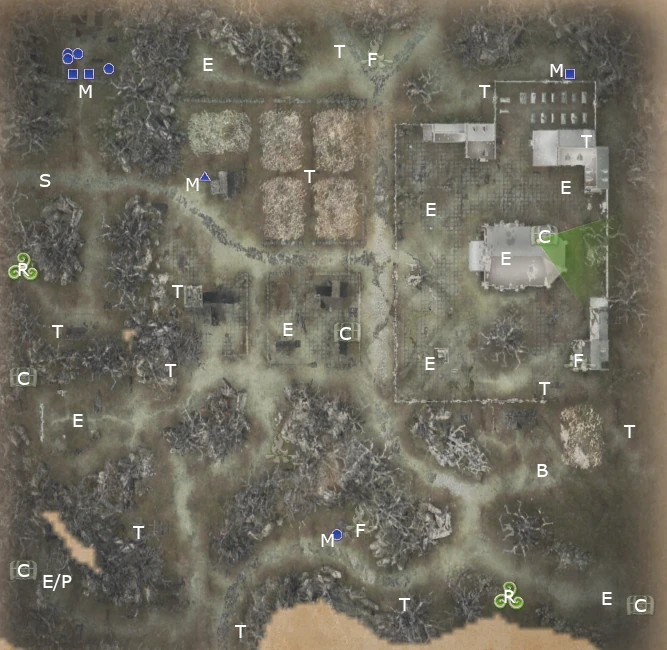
  • KAKT: Old Monastery

    Screenshot by Mike Olgren from King Arthur Knight’s Tale Old Monastery map.

    B = battle (between two other groups)
    C = chest
    E = encounter
    F = campfire
    H = hero
    J1 = jump to J2
    K = locked door (needs key)
    M = point of interest
    N = optional battle
    P = traps
    R = shrine
    S = start
    T = treasure pile
    X = hidden treasure

    Can give healing potion to friar (M with small blue triangle) to gain +1 Christianity.

    Return to King Arthur Knight’s Tale maps