Tag: PC

Games played on a laptop or desktop; in my case, on a device using the Windows operating system.

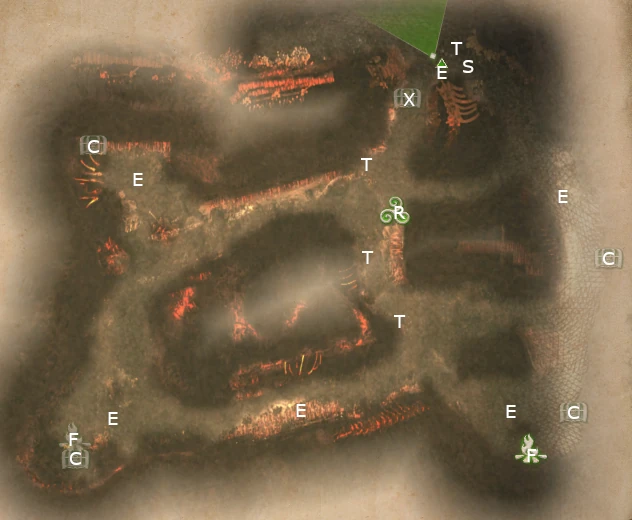
  • KAKT: The Cauldron

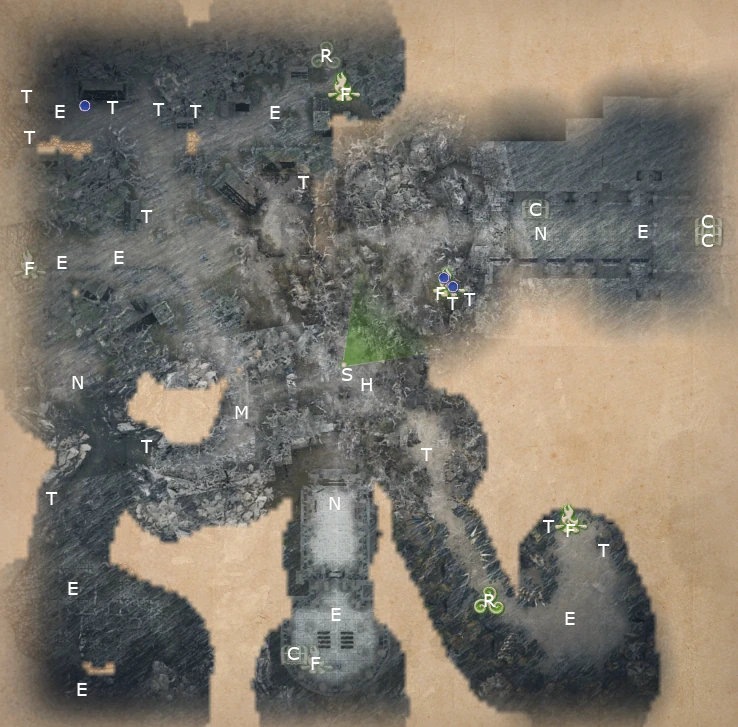
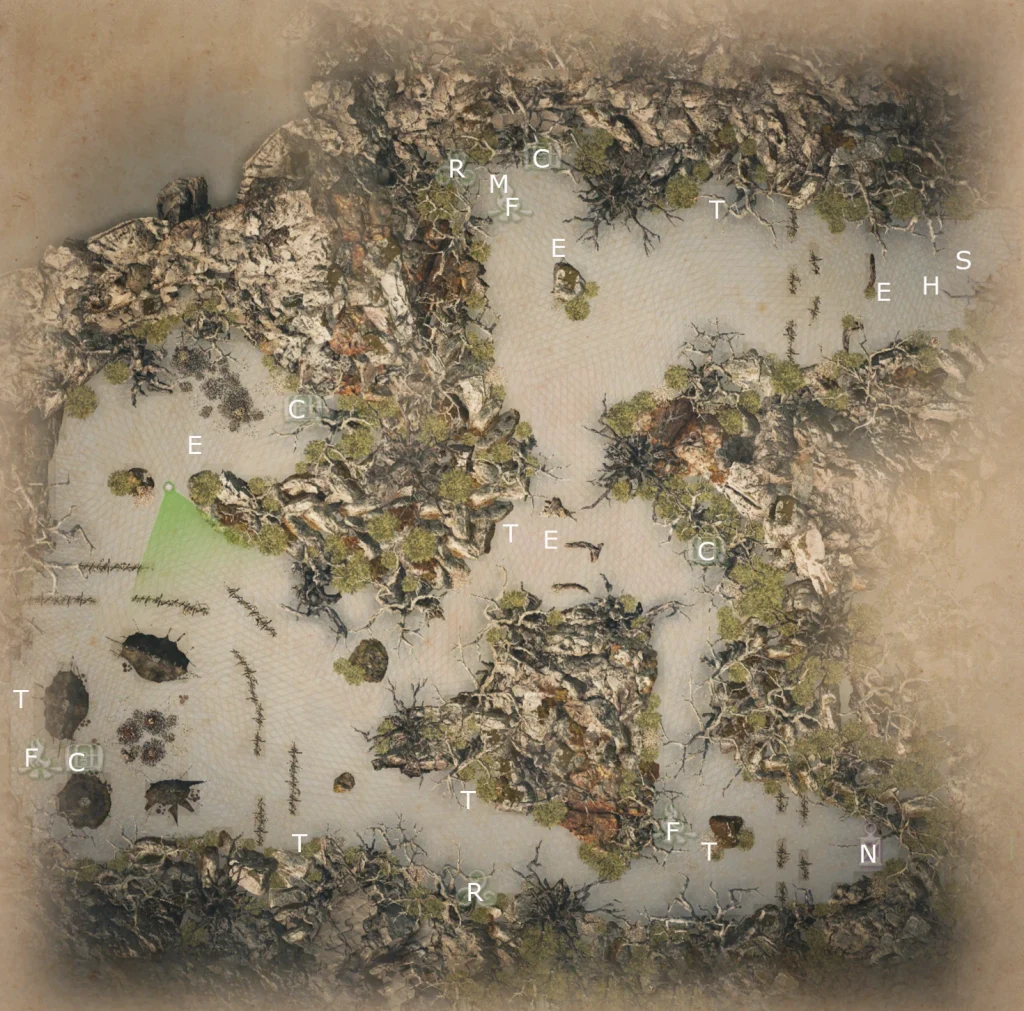
    Map of The Cauldron from King Arthur Knight's Tale game.
    Screenshot by Mike Olgren from King Arthur Knight’s Tale The Cauldron map.

    B = battle (between two other groups)
    C = chest
    E = encounter
    F = campfire
    H = hero
    J1 = jump to J2
    K = locked door (needs key)
    M = point of interest
    N = optional battle
    P = traps
    R = shrine
    S = start
    T = treasure pile
    X = hidden treasure

    Hero is Sir Percivale, who joins here and then Round Table.

    Return to King Arthur Knight’s Tale maps.
  • KAKT: The Ancient Throne

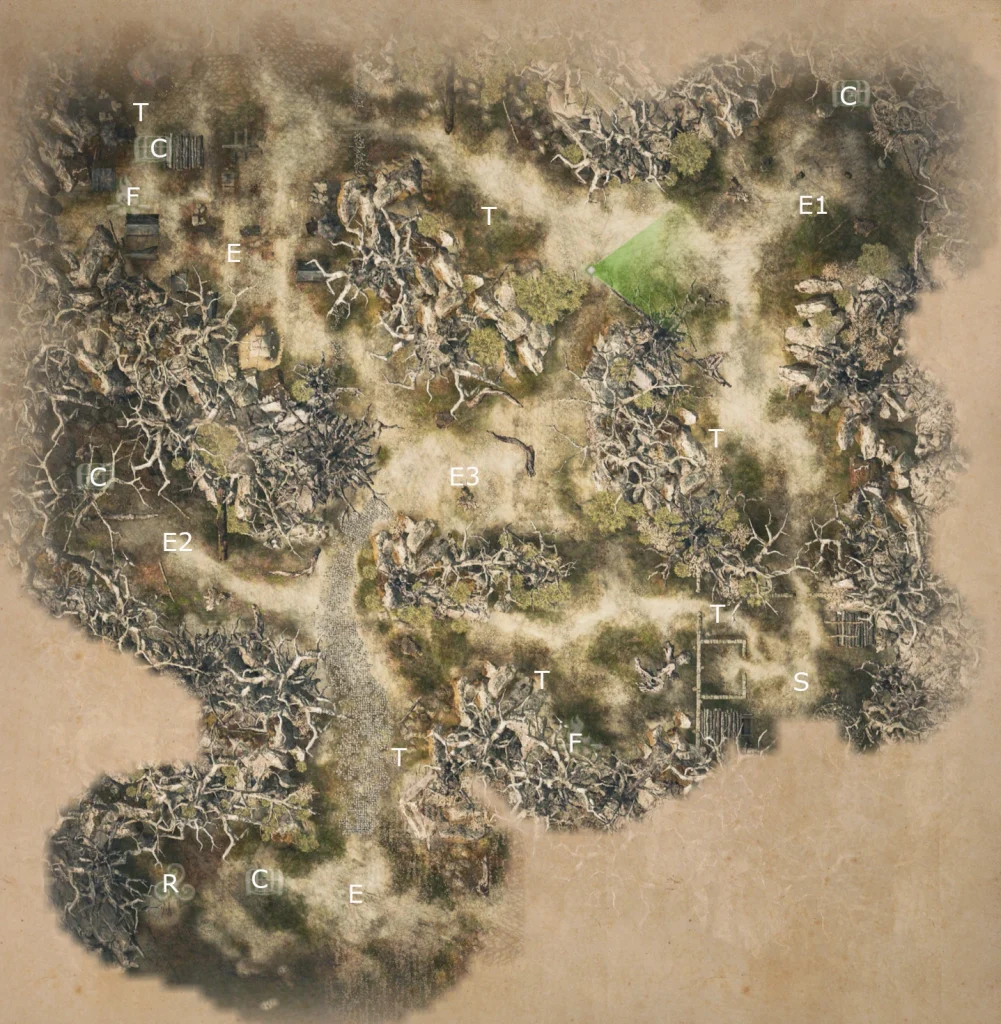
    Map of The Ancient Throne from King Arthur Knight's Tale game.
    Screenshot by Mike Olgren from King Arthur Knight’s Tale The Ancient Throne map.

    B = battle (between two other groups)
    C = chest
    E = encounter
    F = campfire
    H = hero
    J1 = jump to J2
    K = locked door (needs key)
    M = point of interest
    N = optional battle
    P = traps
    R = shrine
    S = start
    T = treasure pile
    X = hidden treasure

    Return to King Arthur Knight’s Tale maps

  • KAKT: hero map

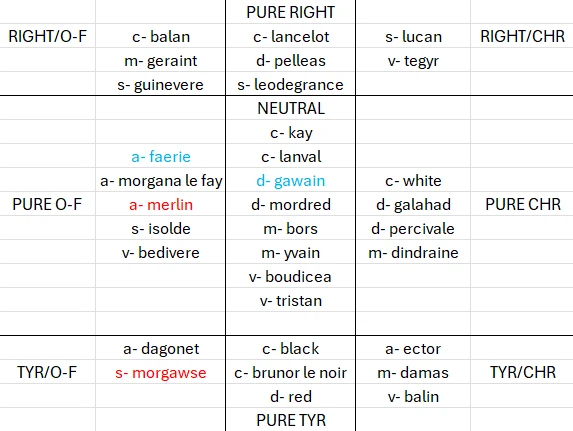
    Table or map of the heroes in King Arthur: Knight's Tale game.

    These are the heroes available in King Arthur: Knight’s Tale, arranged by morality. The letters preceding the hero’s name are their class:

    • a- Arcanist
    • c- Champion
    • d- Defender
    • m- Marksman
    • s- Sage
    • v- Vanguard

    Heroes in red or blue font are mutually exclusive, i.e. you cannot have Merlin and Morgawse at the same time.

    Building a team with similar moralities helps improve loyalty scores, which affect gameplay. Loyalty score and its effects are seen at the top left of the character sheet (only viewable when not on a Mission).

    Back to Hints page.

  • KAKT: The Return of the King

    Screenshot by Mike Olgren from King Arthur Knight’s Tale The Return of the King map.

    B = battle (between two other groups)
    C = chest
    E = encounter
    F = campfire
    H = hero
    J1 = jump to J2
    K = locked door (needs key)
    M = point of interest
    N = optional battle
    P = traps
    R = shrine
    S = start
    T = treasure pile
    X = hidden treasure

    Seelie priestess will join at start.

    Return to King Arthur Knight’s Tale maps

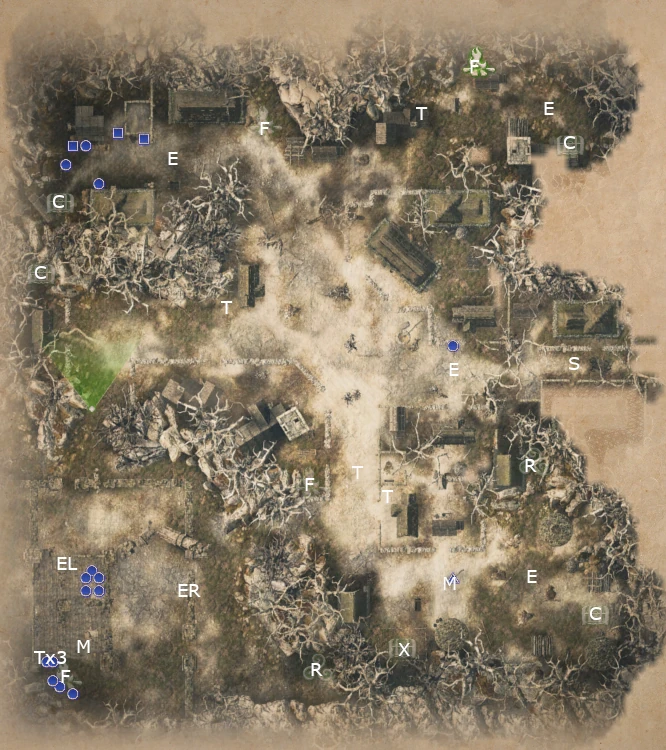
  • KAKT: The Wild Hunt

    Screenshot by Mike Olgren from King Arthur Knight’s Tale The Wild Hunt map.

    B = battle (between two other groups)
    C = chest
    E = encounter
    F = campfire
    H = hero
    J1 = jump to J2
    K = locked door (needs key)
    M = point of interest
    N = optional battle
    P = traps
    R = shrine
    S = start
    T = treasure pile
    X = hidden treasure

    Encounter in SW corner can be on the left (EL) or the right (ER).

    Return to King Arthur Knight’s Tale maps

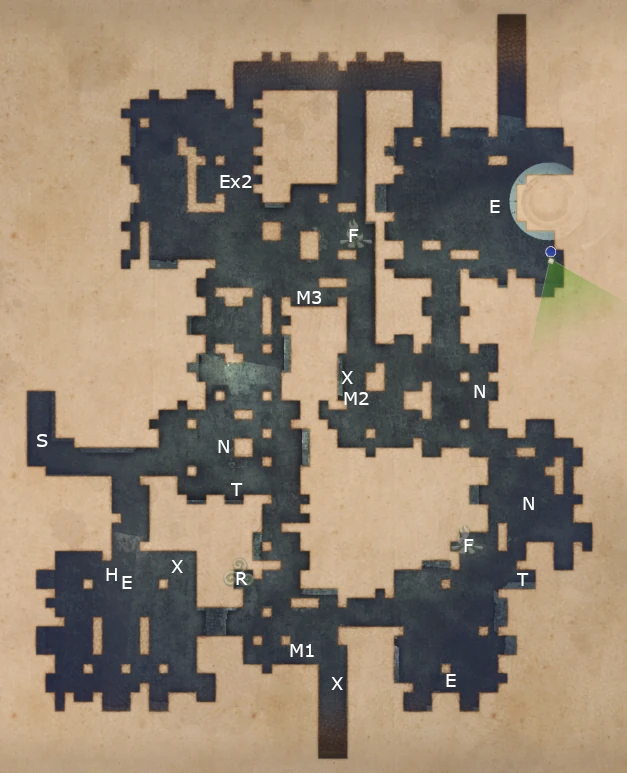
  • KAKT: Cave of Shadows

    Screenshot by Mike Olgren from King Arthur Knight’s Tale Cave of Shadows map.

    B = battle (between two other groups)
    C = chest
    E = encounter
    F = campfire
    H = hero
    J1 = jump to J2
    K = locked door (needs key)
    M = point of interest
    N = optional battle
    P = traps
    R = shrine
    S = start
    T = treasure pile
    X = hidden treasure

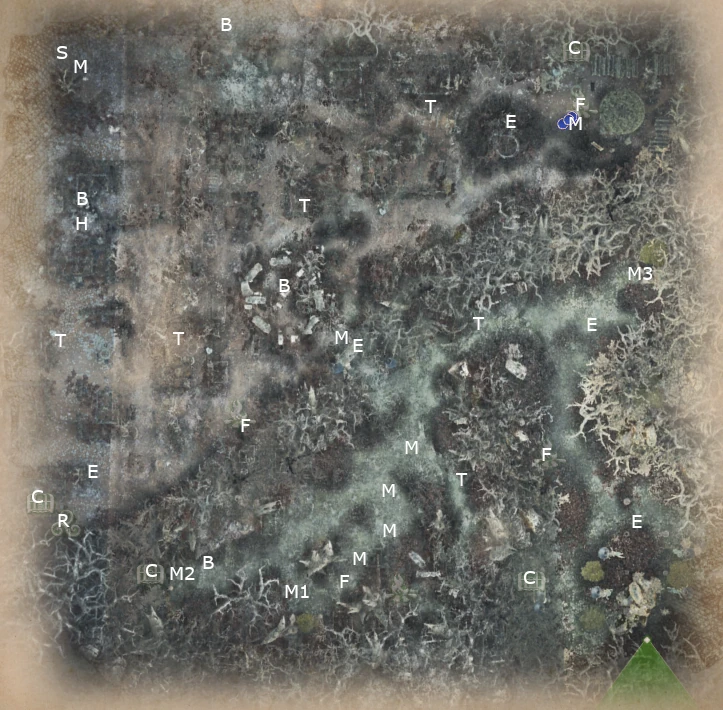
    Hero is Lady Boudicea, who joins. Collecting the numbered points of interest (“M1-3”) will force a battle.

    Return to King Arthur Knight’s Tale maps

  • KAKT: Beyond the Veil

    Screenshot by Mike Olgren from King Arthur Knight’s Tale Beyond the Veil map.

    B = battle (between two other groups)
    C = chest
    E = encounter
    F = campfire
    H = hero
    J1 = jump to J2
    K = locked door (needs key)
    M = point of interest
    N = optional battle
    P = traps
    R = shrine
    S = start
    T = treasure pile
    X = hidden treasure

    Hero is Faerie Knight, who joins for Mission. After Mission is over, must choose between Faerie Knight and Sir Gawain to join Round Table.

    Return to King Arthur Knight’s Tale maps

  • KAKT: Into the Deepwood

    Screenshot by Mike Olgren from King Arthur Knight’s Tale Into the Deepwood map.

    B = battle (between two other groups)
    C = chest
    E = encounter
    F = campfire
    H = hero
    J1 = jump to J2
    K = locked door (needs key)
    M = point of interest
    N = optional battle
    P = traps
    R = shrine
    S = start
    T = treasure pile
    X = hidden treasure

    Very long Mission. Hero is Sir Gawain, who joins the Mission. Will also meet the Faerie Knight. Neither join Round Table at this time.

    Return to King Arthur Knight’s Tale maps

  • KAKT: The Fisher King

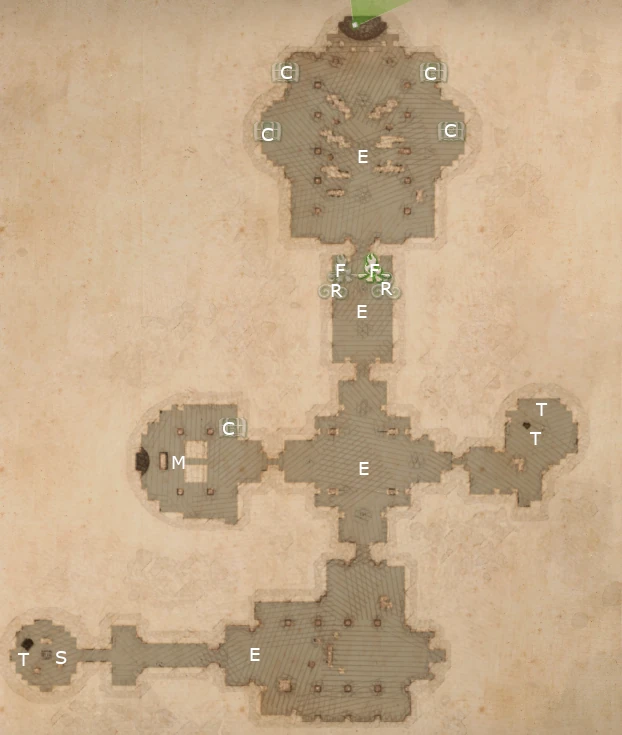
    Map of The Fisher King mission from King Arthur Knight's Tale game.
    Screenshot by Mike Olgren from King Arthur Knight’s Tale The Fisher King map.

    B = battle (between two other groups)
    C = chest
    E = encounter
    F = campfire
    H = hero
    J1 = jump to J2
    K = locked door (needs key)
    M = point of interest
    N = optional battle
    P = traps
    R = shrine
    S = start
    T = treasure pile
    X = hidden treasure

    This Mission ends Act 2.

    Return to King Arthur Knight’s Tale maps

  • KAKT: The Horn of the Dauntless

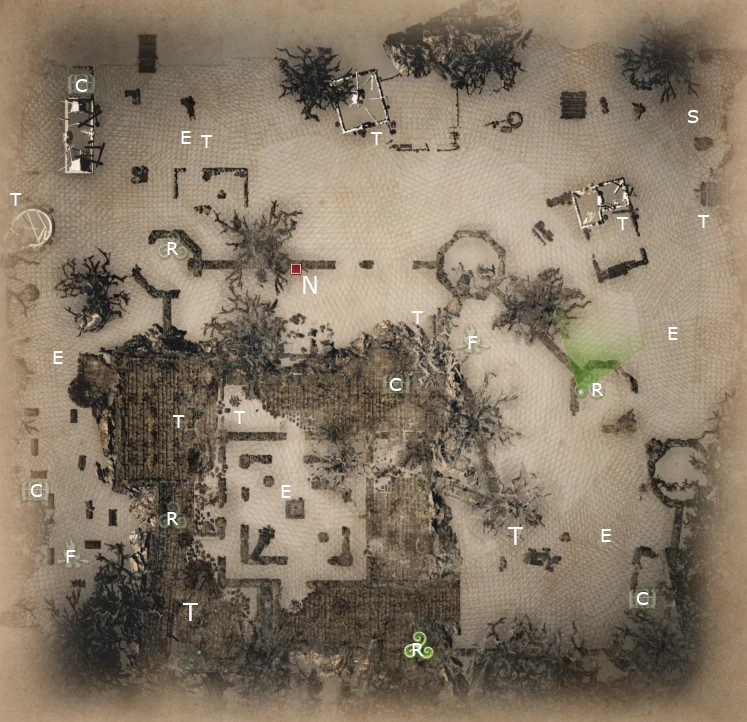
    Screenshot by Mike Olgren from King Arthur Knight’s Tale The Horn of the Dauntless map.

    B = battle (between two other groups)
    C = chest
    E = encounter
    F = campfire
    H = hero
    J1 = jump to J2
    K = locked door (needs key)
    M = point of interest
    N = optional battle
    P = traps
    R = shrine
    S = start
    T = treasure pile
    X = hidden treasure

    Return to King Arthur Knight’s Tale maps