Tag: Tactical

Tactical games are usually turn-based and often use a grid for movement.

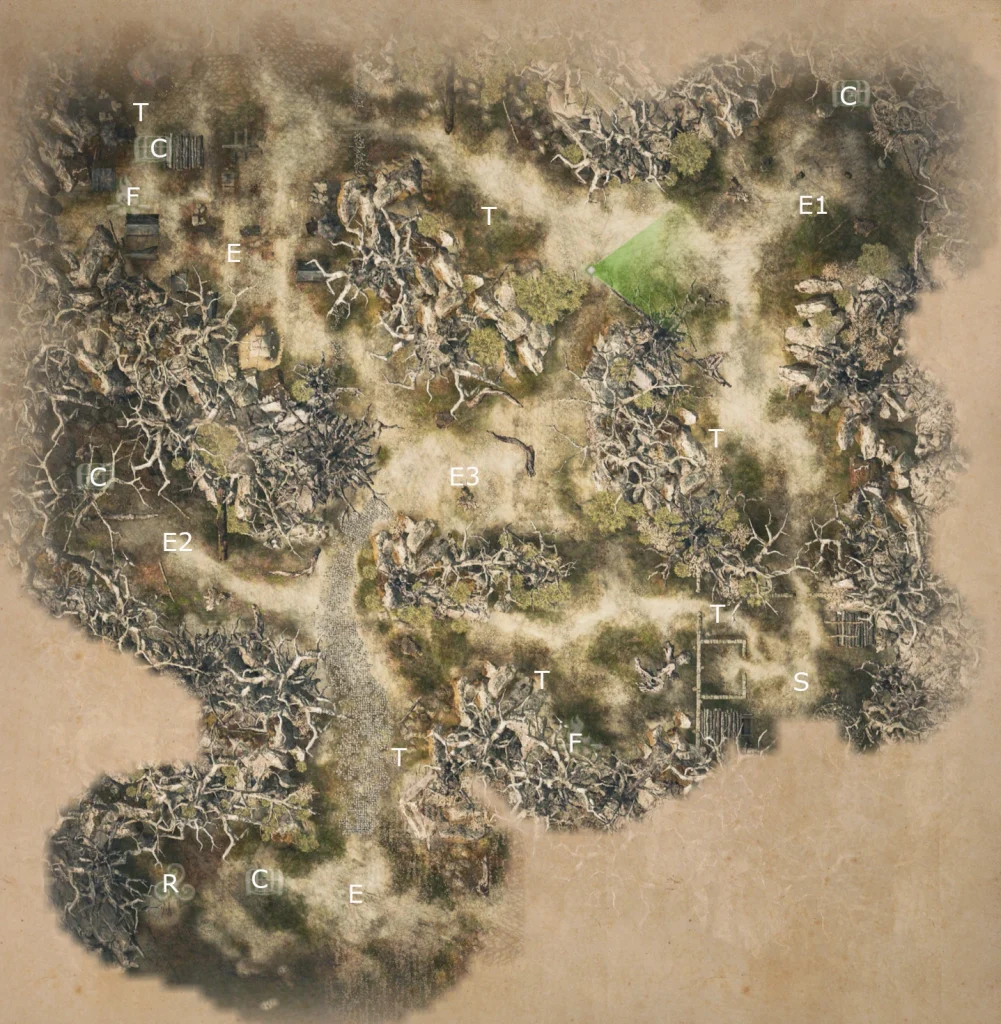
  • KAKT: Heart of Midnight

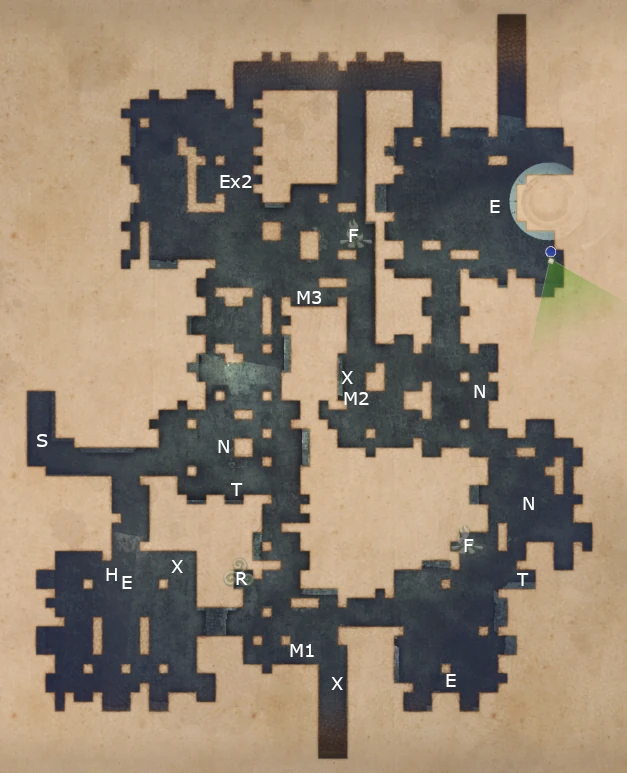
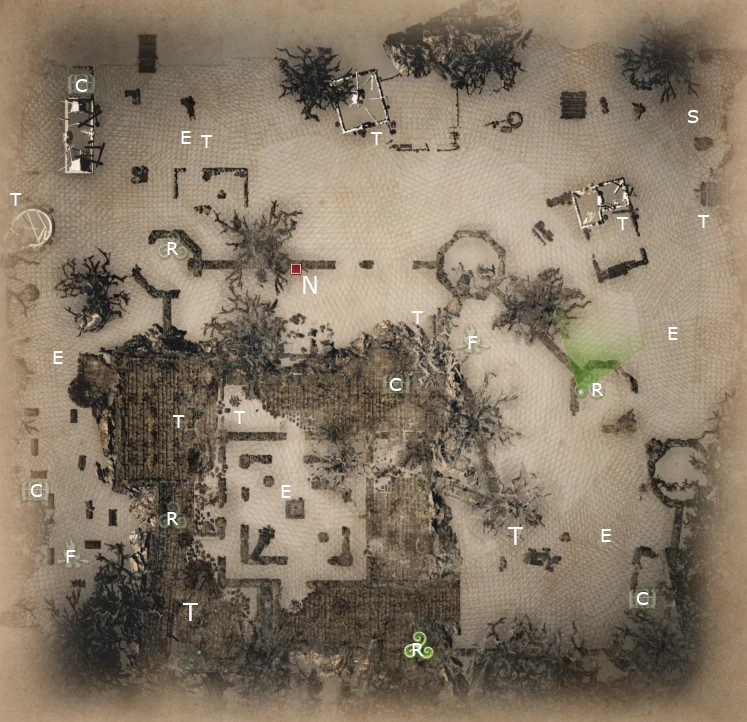
    Map of Heart of Midnight from King Arthur Knight's Tale game.
    Screenshot by Mike Olgren from King Arthur Knight’s Tale Heart of Midnight map.

    B = battle (between two other groups)
    C = chest
    E = encounter
    F = campfire
    H = hero
    J1 = jump to J2
    K = locked door (needs key)
    M = point of interest
    N = optional battle
    P = traps
    R = shrine
    S = start
    T = treasure pile
    X = hidden treasure

    I found the final battle here to be a crazy spike in difficulty, even on Moderate. [I completed it one notch down on Normal]. You cannot change difficulty once on a mission. You can only change difficulty on the world map or in Camelot.

    Return to King Arthur Knight’s Tale maps

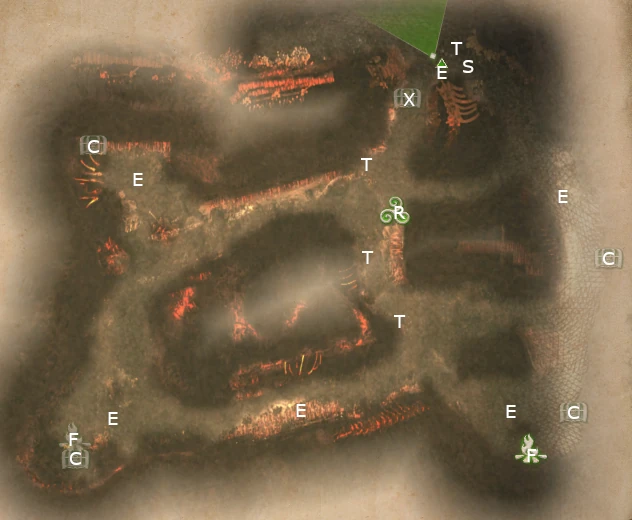
  • KAKT: The Warrior Queen

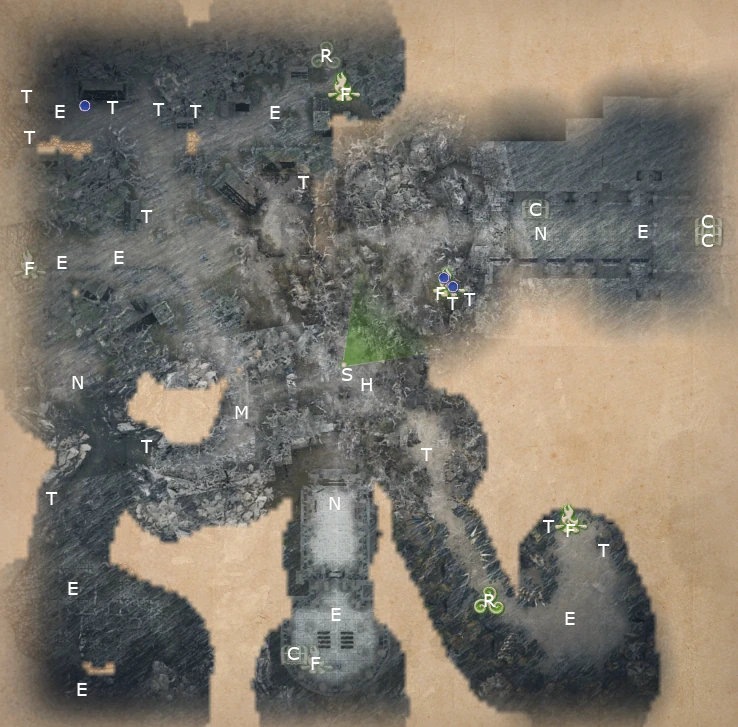
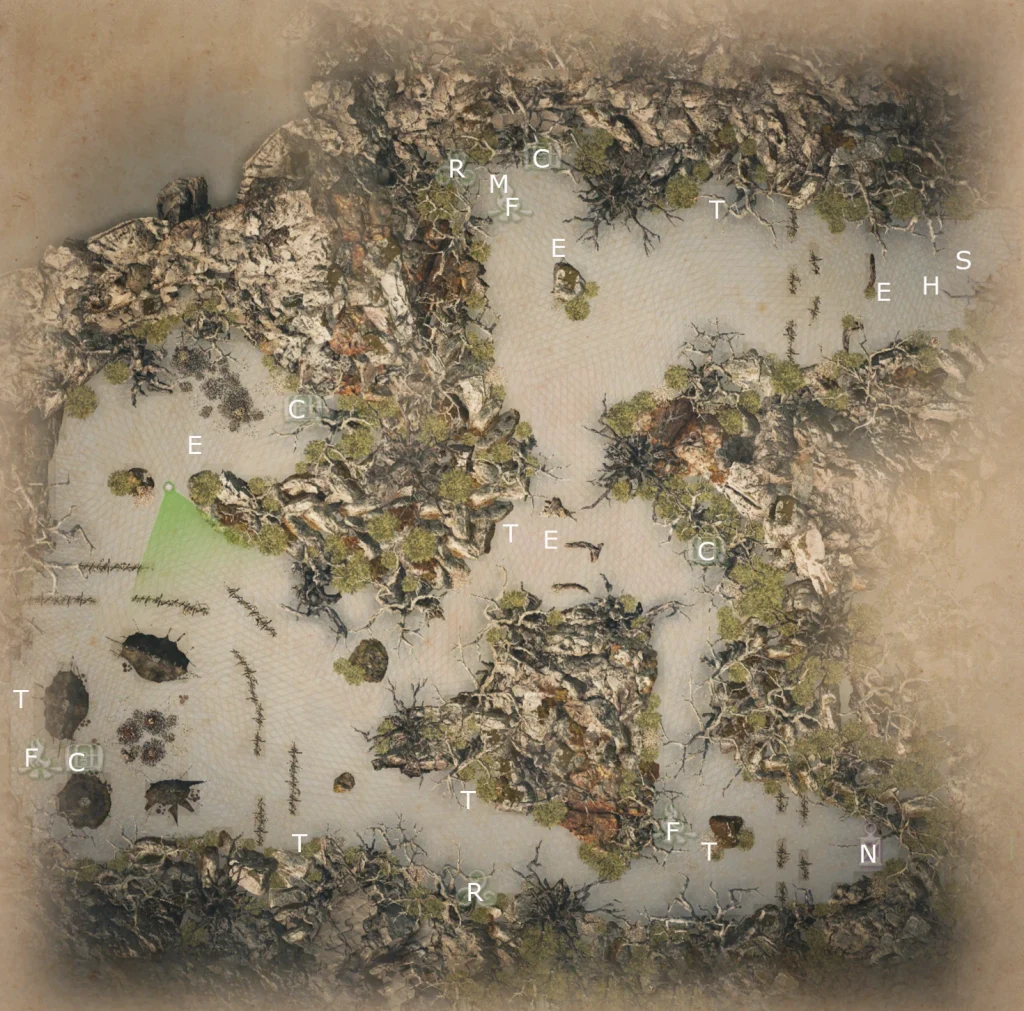
    Map of The Warrior Queen from King Arthur Knight's Tale mission.
    Screenshot by Mike Olgren from King Arthur Knight’s Tale The Warrior Queen map.

    B = battle (between two other groups)
    C = chest
    E = encounter
    F = campfire
    H = hero
    J1 = jump to J2
    K = locked door (needs key)
    M = point of interest
    N = optional battle
    P = traps
    R = shrine
    S = start
    T = treasure pile
    X = hidden treasure

    Hero is Lady Boudicea; you cannot recruit her yet, but she does fight with you (once freed).

    Return to King Arthur Knight’s Tale maps

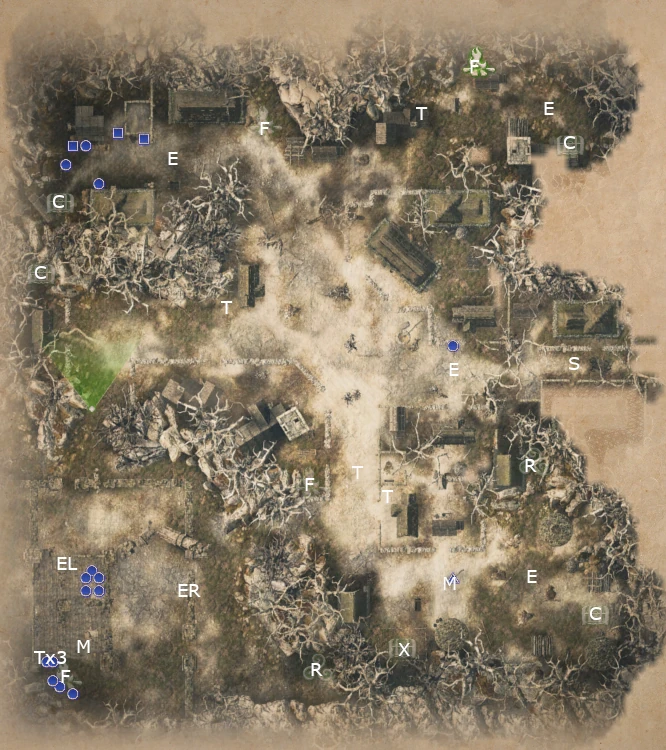
  • KAKT: The Return

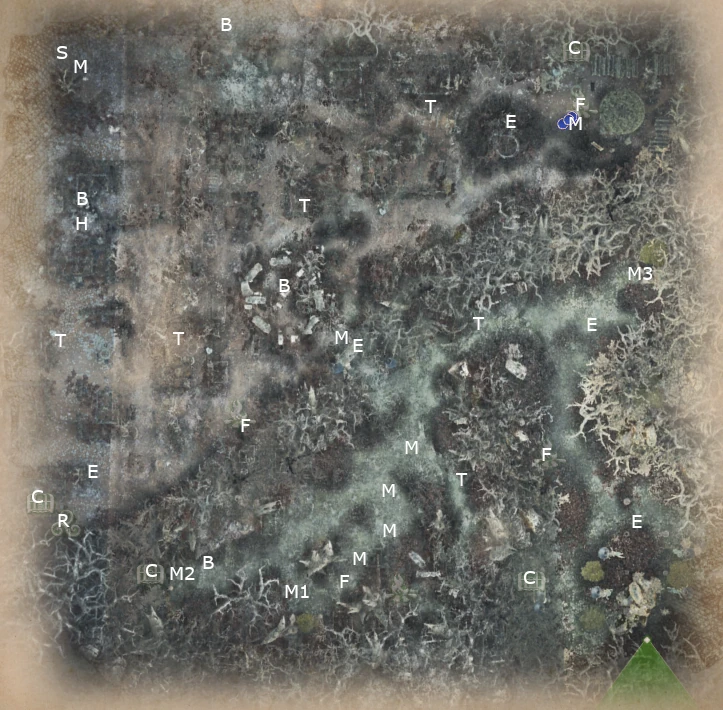
    Map of The Return in King Arthur Knight's Tale .
    Screenshot by Mike Olgren from King Arthur Knight’s Tale The Return map.

    B = battle (between two other groups)
    C = chest
    E = encounter
    F = campfire
    H = hero
    J1 = jump to J2
    K = locked door (needs key)
    M = point of interest
    N = optional battle
    P = traps
    R = shrine
    S = start
    T = treasure pile
    X = hidden treasure

    Final battle (south) is tough.

    Return to King Arthur Knight’s Tale maps

  • KAKT: Thistlewood Ruins

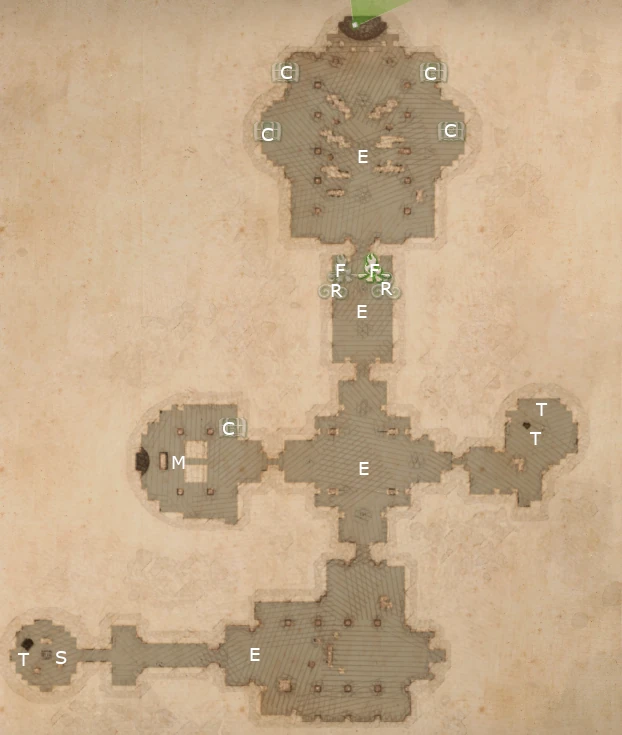
    Map of Thistlewood Ruins in King Arthur Knight's Tale game.
    Screenshot by Mike Olgren from King Arthur Knight’s Tale Thistlewood Ruins map

    B = battle (between two other groups)
    C = chest
    E = encounter
    F = campfire
    H = hero
    J1 = jump to J2
    K = locked door (needs key)
    M = point of interest
    N = optional battle
    P = traps
    R = shrine
    S = start
    T = treasure pile
    X = hidden treasure

    Return to King Arthur Knight’s Tale maps

  • KAKT: The Haunted Forest

    Map of The Haunted Forest from King Arthur Knight's Tale game
    Screenshot by Mike Olgren from King Arthur Knight’s Tale The Haunted Forest mission

    B = battle (between two other groups)
    C = chest
    E = encounter
    F = campfire
    H = hero
    J1 = jump to J2
    K = locked door (needs key)
    M = point of interest
    N = optional battle
    P = traps
    R = shrine
    S = start
    T = treasure pile
    X = hidden treasure

    Encounters in the north and south areas are optional but will add loot and experience.

    Return to King Arthur Knight’s Tale maps

  • KAKT: Forbidden Keep

    Screenshot by Mike Olgren from King Arthur Knight’s Tale Forbidden Keep map

    B = battle (between two other groups)
    C = chest
    E = encounter
    F = campfire
    H = hero
    J1 = jump to J2
    K = locked door (needs key)
    M = point of interest
    N = optional battle
    P = traps
    R = shrine
    S = start
    T = treasure pile
    X = hidden treasure

    Return to King Arthur Knight’s Tale maps

  • KAKT: The Cursed Ship

    Map of The Cursed Ship mission in King Arthur Knight's Tale game.
    Screenshot by Mike Olgren from King Arthur Knight’s Tale The Cursed Ship map.

    B = battle (between two other groups)
    C = chest
    E = encounter
    F = campfire
    H = hero
    J1 = jump to J2
    K = locked door (needs key)
    M = point of interest
    N = optional battle
    P = traps
    R = shrine
    S = start
    T = treasure pile
    X = hidden treasure

    Return to King Arthur Knight’s Tale maps

  • KAKT: Old Monastery

    Screenshot by Mike Olgren from King Arthur Knight’s Tale Old Monastery map.

    B = battle (between two other groups)
    C = chest
    E = encounter
    F = campfire
    H = hero
    J1 = jump to J2
    K = locked door (needs key)
    M = point of interest
    N = optional battle
    P = traps
    R = shrine
    S = start
    T = treasure pile
    X = hidden treasure

    Can give healing potion to friar (M with small blue triangle) to gain +1 Christianity.

    Return to King Arthur Knight’s Tale maps

  • KAKT: Treachery

    Map of Treachery in King Arthur Knight's Tale
    Screenshot by Mike Olgren from King Arthur Knight’s Tale Treachery map.

    B = battle (between two other groups)
    C = chest
    E = encounter
    F = campfire
    H = hero
    J1 = jump to J2
    K = locked door (needs key)
    M = point of interest
    N = optional battle
    P = traps
    R = shrine
    S = start
    T = treasure pile
    X = hidden treasure

    North point of interest is a knight who will fight with you if you heal him (useful as distraction target!).

    Southwest optional encounter depends on dialog choices. If duel Sir Lanval, will have Tyrant and Rightful options.

    Return to King Arthur Knight’s Tale maps

  • KAKT: Fire with Fire

    Map of Fire with Fire mission from King Arthur Knight's Tale game.
    Screenshot by Mike Olgren from King Arthur Knight’s Tale Fire with Fire map.

    B = battle (between two other groups)
    C = chest
    E = encounter
    F = campfire
    H = hero
    J1 = jump to J2
    K = locked door (needs key)
    M = point of interest
    N = optional battle
    P = traps
    R = shrine
    S = start
    T = treasure pile
    X = hidden treasure

    Hero is Sir Ector, who joins Mission.

    Return to King Arthur Knight’s Tale maps